
How to Clean Floors Naturally in Ras Al Khaimah
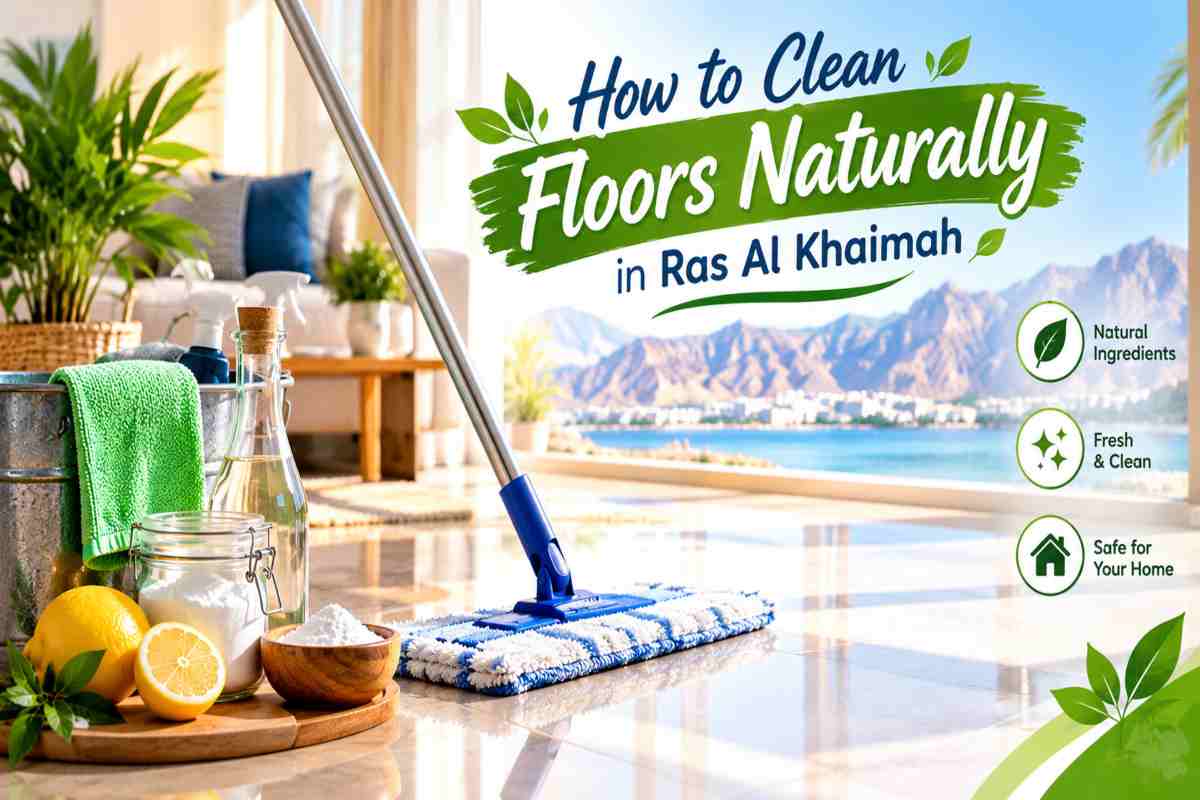
How to clean floors naturally takes three steps, sweep or vacuum away loose dust, wipe with a barely damp mop and warm water mixed with a few drops of mild liquid soap, then dry the floor straight away. Vinegar suits glazed tile only and should never go on natural stone or wood.
How to clean floors naturally in Ras Al Khaimah depends on the floor under your feet, because fine desert dust, summer humidity and hard water leave a film that each surface handles differently. White vinegar, for example, has a pH of roughly 2 to 3 and cuts through residue on glazed tile, but the same acidity dulls marble and travertine. Wood and laminate have a different weakness, which is too much water.
This guide covers each floor type, from hardwood and tile to stone and vinyl, with safe recipes and routines for RAK homes. If a floor is cracked, lifting or damaged beyond cleaning, Home Fix Building Maintenance offers flooring and roof services across Ras Al Khaimah.
Why Clean Floors Naturally in Ras Al Khaimah Homes
Natural cleaning suits Ras Al Khaimah homes because the local climate leaves dust, moisture and mineral residue on floors and gentle methods remove these without harming surfaces or indoor air. Harsh chemicals can add a second problem on top of the first, such as dull stone, swollen wood or a sticky film.

Fine dust, sand and humidity what RAK floors face
RAK floors face fine desert dust and sand that enter through doors and windows and in summer the humid air makes that dust cling to the surface. Dust and sand grains act like sandpaper underfoot, so sweeping or vacuuming before every mop is the most important step in natural floor care. Humidity adds a second risk, because wood and laminate absorb moisture from the air and from over wet mopping, which can lead to cupping, lifting edges and dark marks along the boards. A damp, well wrung microfibre mop and a dry cloth afterwards keep the surface clean without adding water the floor cannot handle.
Hard water and salt residue on tiles and stone
Hard water and coastal salt leave a pale, chalky film on tiles and stone and a mild natural cleaner removes it more safely than a strong acid. Many homes in the UAE use mineral rich water and when it dries on a floor, the minerals leave streaks and dull patches, most visible on dark, glossy tiles. Homes near the coast also collect salt on floors from sea air.
A diluted vinegar rinse can lift this film from glazed ceramic and porcelain, but natural stone such as marble, travertine and limestone should be cleaned only with a pH neutral soap, since acid etches the surface permanently. Drying the floor with a cloth after mopping stops new mineral marks forming as the water evaporates.
Safer for children, pets and indoor air
Natural floor cleaning is safer for children, pets and indoor air because simple ingredients like warm water, mild soap and diluted vinegar leave far fewer harmful residues than strong chemical cleaners. Young children crawl and play on floors and pets lick their paws, so whatever stays on the surface is likely to reach their skin or mouths.
Air quality matters too, since the US Environmental Protection Agency has reported that indoor pollutant levels can be higher two to five times than outdoor levels. In RAK homes, where windows stay shut for air conditioning through much of the year, strong fumes from floor chemicals linger longer. Mild, low fragrance cleaners keep the air fresher and are gentler on the hands of whoever is doing the cleaning.
Natural Floor Cleaning Basics Process and Golden Rules
The basic method for cleaning any floor naturally is to remove loose dirt first, then wipe with a lightly damp mop and a mild cleaner and finally dry the surface. Nearly every floor type, from tile to hardwood, follows these same steps and only the amount of water and the choice of cleaner change.
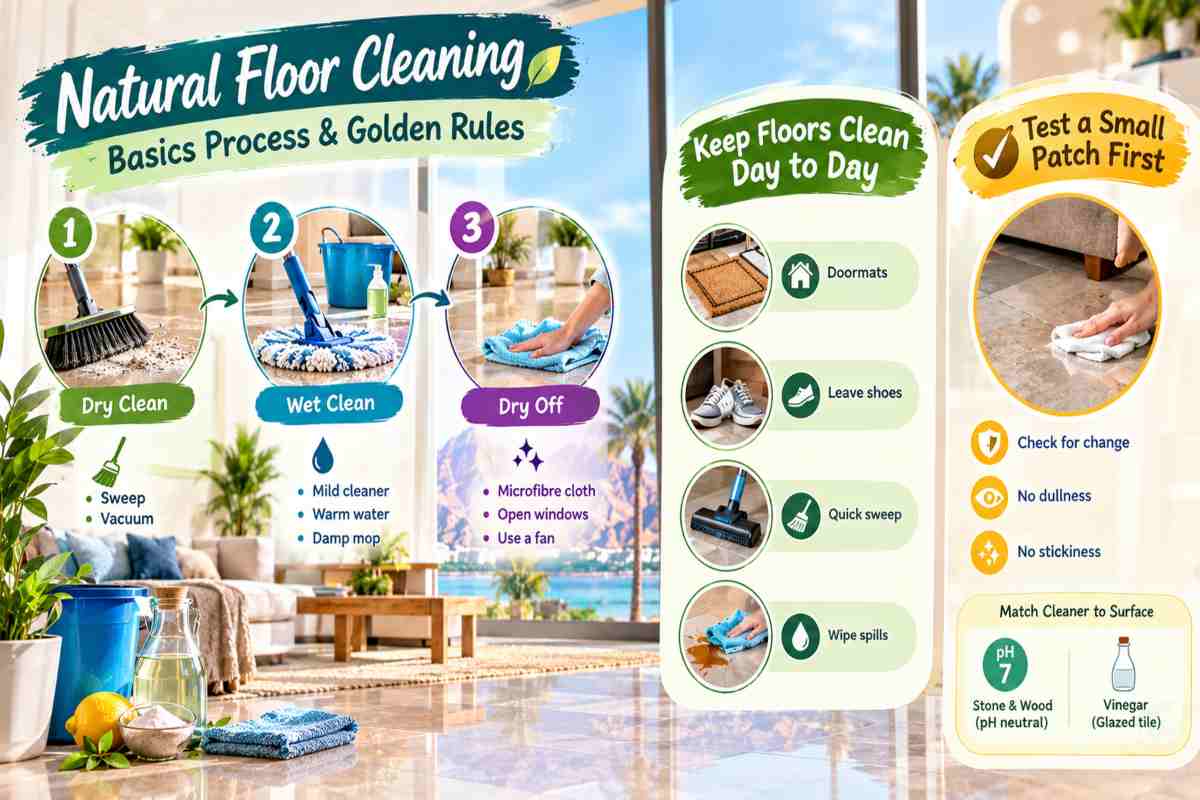
Floor cleaning procedure step by step (dry clean, wet clean, dry off)
A natural floor cleaning procedure has three stages: dry clean, wet clean and dry off. Start by sweeping with a soft brush or vacuuming with a hard floor setting, because dust and sand left on the floor turn into scratching grit once a wet mop drags them across the surface. Next, mix a few drops of mild liquid soap into a bucket of warm water, wring the mop until it is barely damp and work in sections from the far corner towards the door so you never walk over a washed area. Rinse the mop often, since a dirty mop only spreads grime. Finish by drying out the floor with a clean microfibre cloth or by opening the windows and letting the fan run. Drying matters most on wood, laminate and dark tile, where standing water leaves marks and streaks.
How to keep floors clean day to day
The easiest way to keep floors clean day to day is to stop dirt reaching them and to remove it before it settles. Place a doormat outside and another inside each entrance and leave shoes at the door, as this cuts down the sand and dust carried in from outdoors. A quick dry sweep or vacuum every day or two prevents the build up that makes weekly mopping harder. Wipe spills straight away with a soft damp cloth, because liquids that dry on the surface become sticky patches or stains. In a dusty, humid place like Ras Al Khaimah, a short daily routine keeps floors looking cleaner than a long scrub once a month.
Test a small patch first
Always test any natural cleaner on a small, hidden patch before using it on the whole floor, because homemade solutions behave differently on different finishes. Choose a spot under a sofa or inside a wardrobe, apply a little of the mixture, leave it for a few minutes, then wipe it dry and check for dullness, colour change or stickiness.
This is especially important for natural stone, sealed wood and older tiles. A useful rule is to match the cleaner to the surface: a pH neutral cleaner (pH 7) is the safest starting point for stone and wood, while acidic mixtures such as vinegar are better reserved for glazed tile. If the test patch looks even and unchanged once dry, you can go ahead and clean the full floor.
Best Natural Floor Cleaning Solutions
The best natural floor cleaning solutions are warm water with mild liquid soap, diluted white vinegar and a baking soda paste for stains. Each one suits certain floors and harms others, so the right choice depends on what lies under your feet. The recipes below use common kitchen items and are safe in the stated amounts.
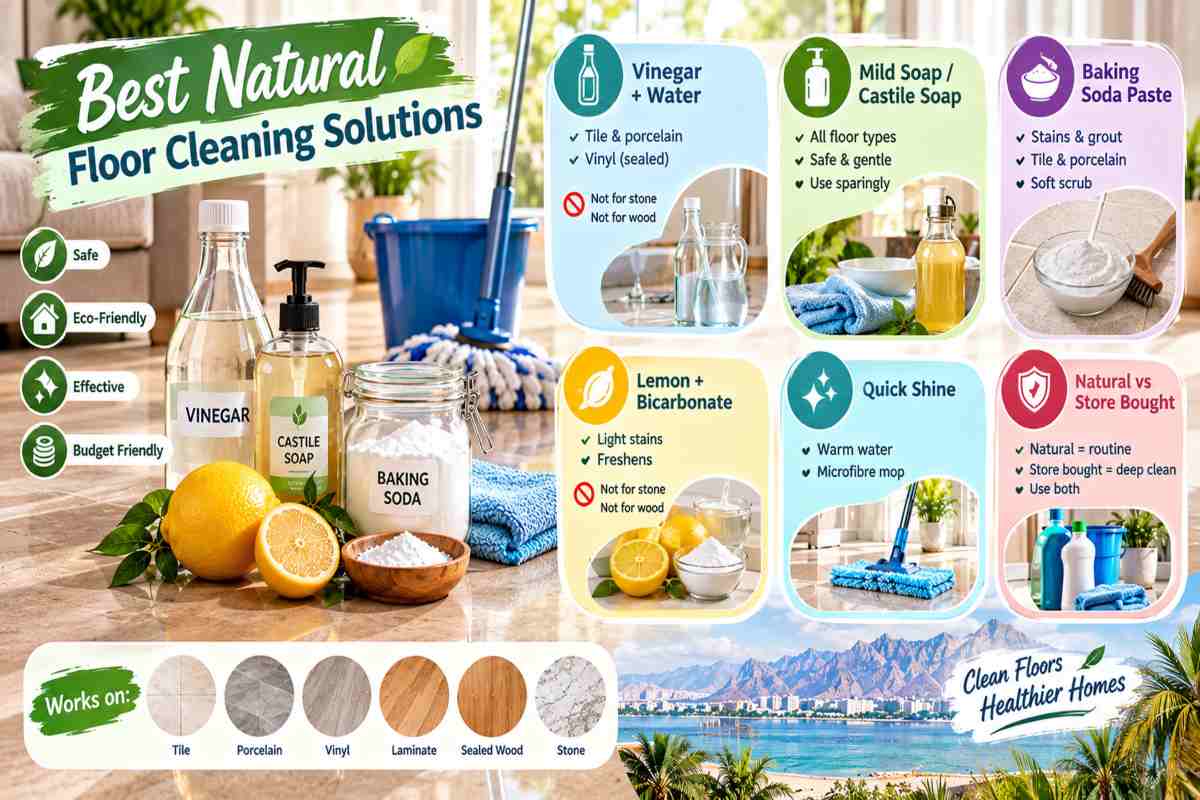
White vinegar and water (where it is safe and where it is not)
White vinegar mixed with water is safe on glazed ceramic tile, porcelain and most sealed vinyl, but never use it on natural stone, unsealed grout or hardwood. Household white vinegar contains about 5% acetic acid and its pH is around 2 to 3, strong enough to dissolve the chalky mineral film hard water leaves behind.
For a basic mix, add about one cup (250 ml) of vinegar to four litres of warm water, mop lightly and dry with a cloth. The same acidity etches marble, travertine, limestone and granite and it can slowly dull wood finishes and wear away grout sealant. Never mix vinegar with bleach or any chlorine product, as the combination releases toxic gas.
Mild liquid soap or castile soap solution
A few drops of mild liquid soap or castile soap in warm water is the safest all round natural floor cleaner. It works on tile, stone, sealed wood, laminate and vinyl because it is close to neutral in pH and lifts grease and everyday dirt without attacking the finish. Use about one teaspoon in four litres of warm water. Too much soap leaves a sticky film that attracts dust, so use sparingly, wring the mop well and rinse with a second mop pass using plain water if the floor feels tacky. For stone and wood floors, this should be your default solution.
Baking soda paste for stains and grout
Baking soda paste removes stubborn stains and grime from grout and tile without scratching, because the grains are soft and the paste is only mildly alkaline. Mix three parts baking soda with one part water to form a thick paste, sprinkle it over the stained area and leave it for 10 to 15 minutes. Then scrub slowly with a soft brush and wipe clean with a damp cloth. It suits grout lines, ceramic and porcelain tile and bathroom floors. On polished stone or glossy surfaces, rub very lightly or test first, since any gritty scrubbing can leave fine marks over time.
Lemon, bicarbonate and other options, with cautions
Lemon juice and bicarbonate of soda can freshen and lift light stains, but both come with limits. Lemon juice is acidic like vinegar, so it should be kept off stone and wood and its natural sugars can leave a sticky residue if not rinsed away. Bicarbonate of soda spread on a damp cloth helps with scuffs on vinyl and sealed tile, though it should not be left to sit on wood. For general shine and streak free results, plain warm water with a clean microfibre mop is often enough and it is the gentlest option for laminate and engineered wood. Natural doesn’t mean harmless, so test each mixture on a small, hidden patch first.
Natural cleaners vs shop bought floor cleaning products
Natural cleaners are cheaper, produce fewer fumes and suit routine cleaning, while shop bought floor cleaning products work better for heavy build up, disinfecting and specialist surfaces. Homemade mixtures cost very little and leave less scent in a closed, air conditioned home.
However, vinegar and soap do not kill germs as reliably as a proper disinfectant, so a shop bought product may be sensible after a spill involving raw food or pet accidents. Specialist cleaners made for stone, wood or laminate are also formulated to match those finishes and they can be a better choice for high value floors. A good approach is to use natural solutions for weekly care and keep one suitable shop bought product for occasional deep cleans.
How to Clean Wood Floors Naturally
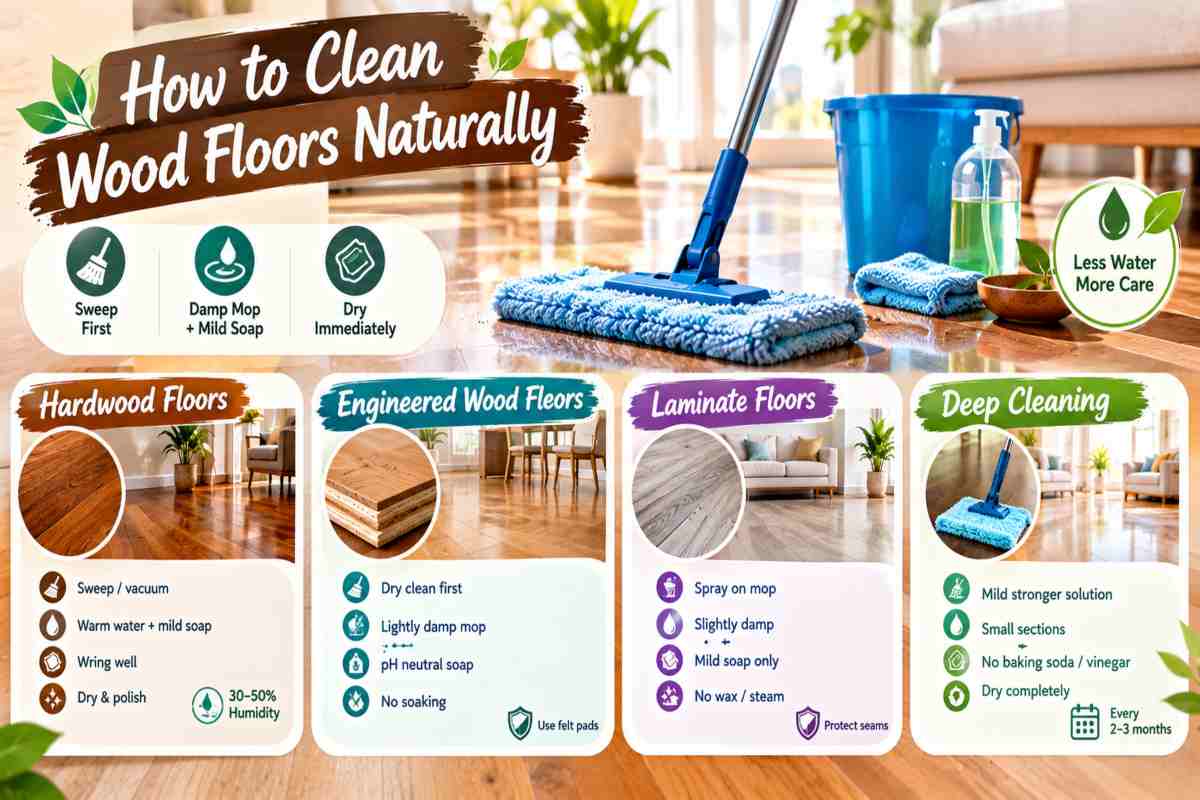
The safest way to clean wood floors naturally is to sweep or vacuum first, then wipe with a barely damp microfibre mop and a mild soap solution and dry the surface straight away. Wood reacts badly to excess water and acidic cleaners, so the amount of moisture matters more than the cleaning product. The right routine differs slightly for solid hardwood, engineered wood and laminate.
How to clean hardwood floors naturally
To clean hardwood floors naturally, remove dust with a soft brush or vacuum, then mop with a well wrung cloth dipped in warm water and a few drops of mild liquid soap. Work along the direction of the grain and dry the boards with a clean cloth right after. Solid hardwood absorbs and releases moisture with the air around it and the National Wood Flooring Association recommends keeping indoor humidity between 30% and 50% to prevent gaps, cupping and warping.
That is a real concern in humid Ras Al Khaimah summers, so avoid soaking the boards and wipe spills at once. Skip vinegar, lemon and steam mops, since acid and heat can dull the finish over time. For care routines specific to solid timber, see Home Fix Building Maintenance guide to hardwood flooring.
Best way to clean engineered wood floors
The best method to cleanse engineered wood floors is dry cleaning first, followed by a lightly damp mop with a pH neutral or mild soap solution. Engineered boards have a real wood surface layer over a plywood or fibreboard core and that core can swell if water seeps through the joints. Use a microfibre mop that is damp rather than wet, clean in small sections and dry each one before moving on. Avoid baking soda paste and abrasive pads, which can scratch the thin top layer and never let water pool along the edges. Felt pads under furniture legs will also protect the finish between cleans.
How to clean laminate wood floors naturally (keep water minimal)
Clean laminate wood floors naturally with as little water as possible, using a mop that is only slightly damp and a very mild soap solution. Laminate has a fibreboard core under a printed wood effect layer and water that reaches the seams causes swelling and lifted edges that cannot be repaired by cleaning.
A spray bottle of warm water with a few drops of liquid soap, applied to the mop rather than the floor, gives good control. Pat over with a dry microfibre cloth to prevent streaks and clear any spills within minutes. Never use wax, oil soap or steam on laminate. If boards have already started to swell or lift, Home Fix Building Maintenance provides laminate flooring repair and replacement in Ras Al Khaimah.
Deep cleaning wood floors safely
To deep clean wood floors safely, use a slightly stronger but still gentle solution, such as warm water with a little more soap and work in small sections with a barely damp cloth. Do not flood the floor or use baking soda scrubs, vinegar soaks or steam. For sticky patches, lay a damp cloth over the spot for a minute to soften it, then wipe it away and dry the area completely.
Deep cleaning once every two to three months is enough for most homes, with regular light cleaning in between. Wood is also more sensitive than harder surfaces, so do not copy methods meant for more resistant floors. For example, granite flooring tolerates far more water and scrubbing than any wood floor does, which is why wood needs this gentler approach. Test any new mixture on a hidden patch before using it across the room.
How to Clean Tile Floors Naturally
The best way to clean tile floors naturally is to sweep or vacuum first, mop with warm water and a few drops of mild soap and then dry the tiles with a clean cloth. Diluted white vinegar can be added for glazed tiles when water marks build up. The grout between tiles needs separate attention, because it is more porous than the tile itself.
How to clean floor tiles naturally (ceramic)
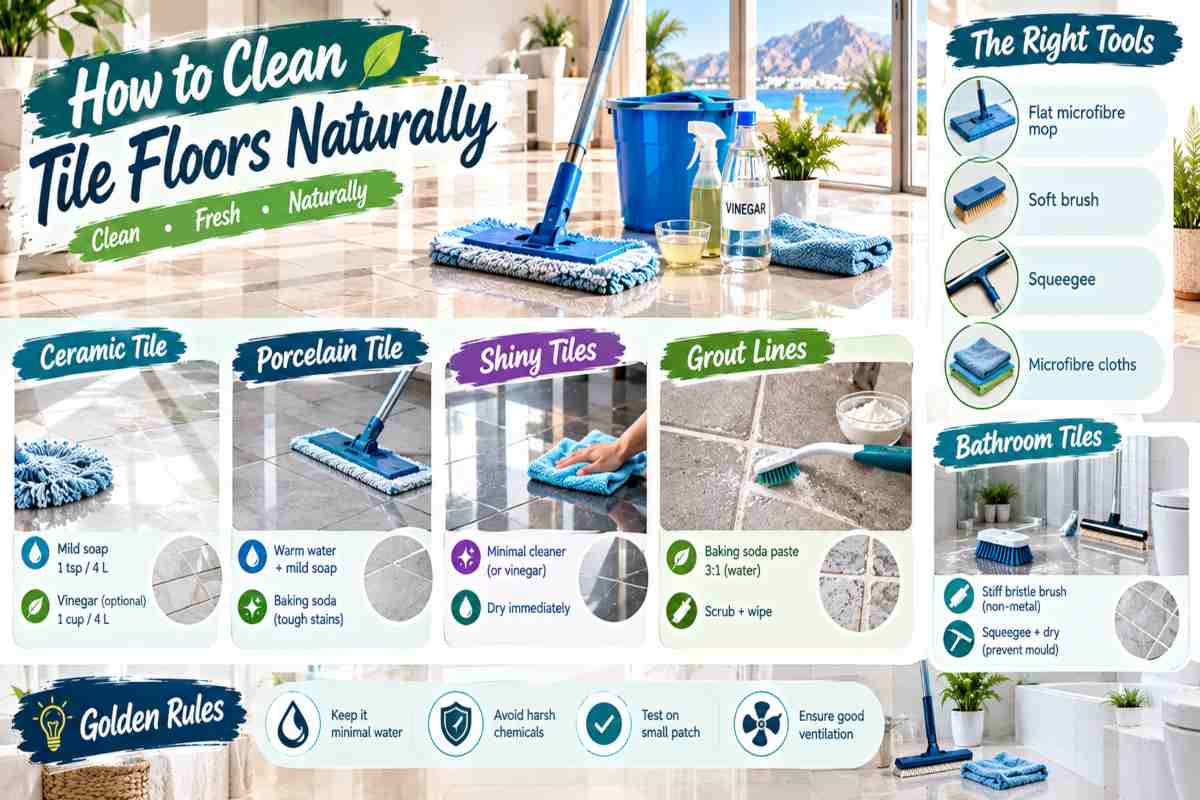
To clean ceramic floor tiles naturally, remove loose dust, then mop with a solution of 1 teaspoon of mild liquid soap in 4 liters of warm water. Glazed ceramic is tough enough to handle a diluted vinegar rinse, about one cup (250 ml) in four litres of water, which cuts through the chalky film left by hard water. Rinse the mop often so you lift the dirt instead of spreading it. Ceramic is less dense than porcelain and its water absorption can exceed 3%, so avoid leaving puddles on cracked tiles or open joints. Dry the floor afterwards to prevent streaks and water spots.
How to clean porcelain tile floors
Porcelain tile floors are cleaned naturally with warm water and mild soap and they tolerate more scrubbing than ceramic because the material is denser and harder. Industry standards define porcelain as having a water absorption rate of 0.5% or less, so spills rarely soak into the tile itself. A damp microfibre mop handles daily cleaning and a baking soda paste lifts stubborn marks when rubbed gently with a soft brush. Polished porcelain scratches more easily than matte finishes, so avoid steel wool and gritty powders. Unglazed or textured porcelain can trap dirt in its surface and a soft bristled brush used along the texture clears it out.
How to clean shiny floor tiles without streaks
To clean shiny floor tiles without streaks, use very little cleaner, change the rinse water often and dry the surface straight away with a microfibre cloth. Streaks on glossy tiles are usually caused by soap residue or by hard water drying in patches, not by dirt. Use only a few drops of soap or add a splash of white vinegar to plain water, to dissolve mineral deposits on glazed tiles. Mop in one direction, then buff dry with a clean, lint free cloth while the floor is still damp. Dark glossy tiles show marks most, so they benefit from a final dry pass every time.
Best mop for tile floors and how to clean grout lines
The best mop for tile floors is a flat microfibre mop, because it picks up fine dust, holds little water and reaches evenly across the surface. Choose washable pads and wring them until barely damp. Sponge mops can push dirty water into grout lines and string mops tend to leave the floor too wet. For the grout lines, make a paste of three parts baking soda to one part water, spread it along the joints and leave it for ten to fifteen minutes. Scrub with a soft toothbrush or grout brush, then wipe clean with a damp cloth. Grout is porous and picks up stains easily, so avoid acidic cleaners on it, since vinegar can wear down the grout over time.
Bathroom floor cleaning brush and tool choices
For bathroom floors, a stiff bristled hand brush or long handled deck brush, plus a squeegee and microfibre cloths, delivers the best natural clean. Bathroom tiles collect soap scum, limescale and damp, so the brush should be firm enough to loosen residue but not metal bristled, which can scratch glazed tiles.
Scrub with warm water and soap or with baking soda on stained patches, working towards the drain. Pull the water across the floor with the squeegee and wipe the corners dry to discourage mould. Keeping a separate brush and cloth for the bathroom stops germs spreading to other floors. Good ventilation helps too, as an extractor fan or an open window dries the room quickly in Ras Al Khaimah’s humid weather.
How to Clean Natural Stone Floors
The safest way to clean natural stone floors is to dust them first, then mop with warm water and a pH neutral stone cleaner or a few drops of mild soap and dry the surface straight away. Acidic products such as vinegar and lemon should be kept off most natural stones and the exact method depends on the type of stone underfoot.
How to clean natural stone floors (the pH neutral rule)
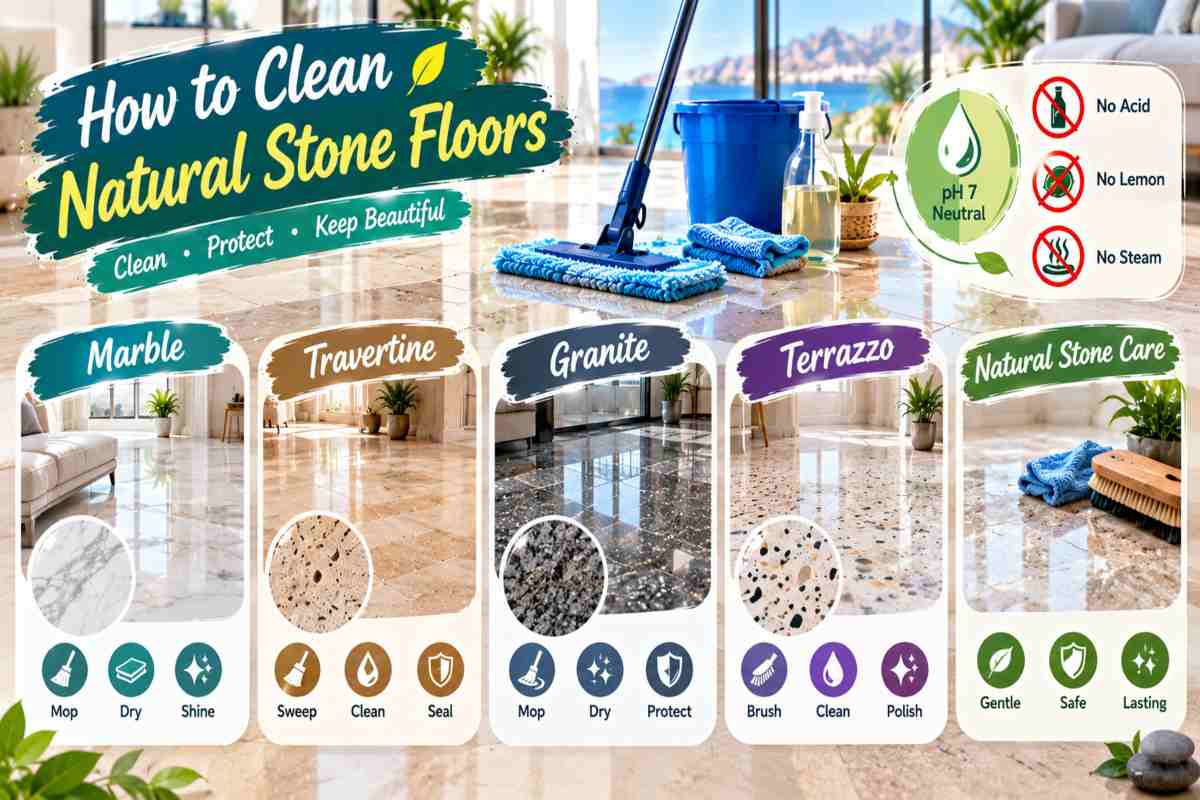
The pH neutral rule means using a cleaner with a pH close to 7, because acids and strong alkalis can damage natural stone. Neutral cleaners include warm water with a few drops of mild liquid soap or a stone specific product. Calcareous stones such as marble, travertine and limestone are made largely of calcium carbonate, which dissolves when it meets acid, so even a mild acidic spill can leave a permanent dull patch called an etch. Always dust or vacuum first, since grit scratches soft stone and uses a soft, slightly damp microfibre mop. Dry the floor with a cloth to stop water marks. Sealed stone resists stains better, but sealing does not protect against etching.
Best way to clean marble floors and remove marble floor stains
The best way to clean marble floors is a soft microfibre mop with warm water and a small amount of pH neutral soap, followed by a dry buff. Marble is relatively soft, rating about 3 on the Mohs hardness scale, so it scratches and etches more easily than granite. For stains, match the treatment to the cause.
Oil based stains from cooking oil or cosmetics respond to a poultice of baking soda mixed with water into a paste, spread over the stain, covered with cling film and left for 24 hours before being wiped away. Rust and deep set marks are harder to shift and may need professional polishing. Avoid vinegar, lemon, bleach and abrasive powders, which dull the finish and wipe up spills such as juice or wine immediately.
How to clean travertine floors naturally
To clean travertine floors naturally, sweep or vacuum with a soft attachment and mop with warm water and a pH neutral cleaner or a few drops of mild soap. Travertine is a porous limestone with small natural holes and pits, which trap dirt and moisture more easily than denser stone.
Many travertine floors have their pits filled with grout or resin during manufacture and a soft brush helps lift dirt from the surface and any open pores. Avoid vinegar and acidic bathroom cleaners, as they etch the stone and eat into the filler. Rinse with clean water, dry thoroughly and reseal the floor regularly, since sealing slows stain absorption in such a porous material.
How to clean granite floors
Granite floors are cleaned with warm water and a mild, pH neutral soap, using a damp microfibre mop and a dry cloth to finish. Granite is a hard igneous rock, rating about 6 to 7 on Mohs scale so it resists scratching and everyday wear far better than marble. It is not acid proof in practice, though, because acidic cleaners can weaken the sealer and dull the shine over time. Stick with gentle cleaners for routine care. For an oily stain, a baking soda paste left on the area for several hours usually draws it out. Granite is also slightly porous, so a good sealer, reapplied as advised by the installer, helps it stay stain resistant.
How to clean terrazzo floors
To clean terrazzo floors, sweep regularly and mop with warm water and a cleaner, bypassing acids, bleach and harsh scrubbing pads. Terrazzo is made of marble, granite or glass chips set in cement or resin, so the marble chips and cement binder inside it are as vulnerable to acid etching as marble itself. Wring out the mop well to keep water from soaking into the cement and dry the floor afterwards to avoid streaks. A soft pad or microfibre cloth removes scuffs without scratching the polish. Over the years, terrazzo can lose its shine and professional polishing and resealing will bring it back far better than any home mixture can.
How to Clean Vinyl and PVC Flooring
The best way to clean vinyl and PVC flooring is to sweep or vacuum first, then mop with warm water and a few drops of mild soap, using a well wrung mop to keep the seams dry. Both materials are plastic based and water resistant at the surface, but harsh solvents, abrasive pads and heavy steam can dull or damage the top layer.
How to clean vinyl flooring and vinyl tile floors
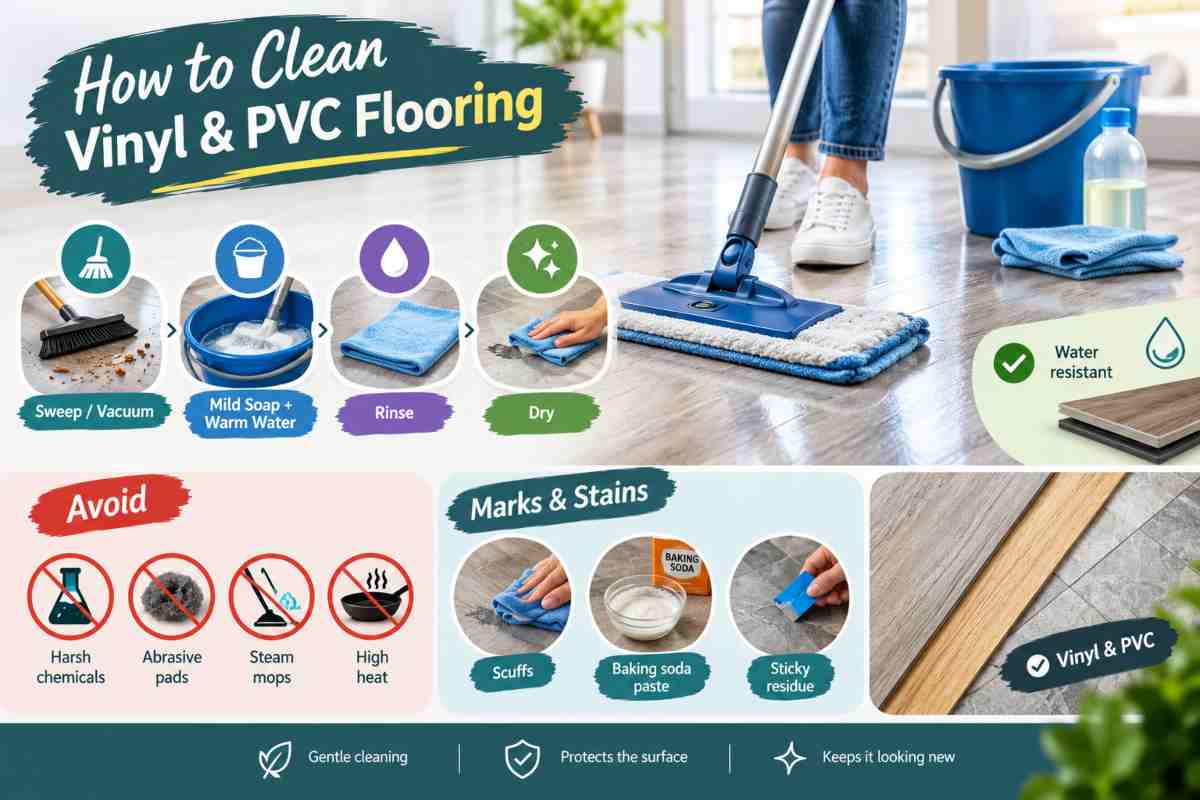
To clean vinyl flooring and vinyl tile floors, remove loose grit with a soft brush or vacuum, then mop with one teaspoon of mild liquid soap in four litres of warm water. Rinse with a second pass of clean water if the floor feels tacky, then dry with a microfibre cloth to avoid streaks. A diluted white vinegar rinse, about half a cup (125 ml) in four litres, can lift hard water film from sealed vinyl, but avoid it on older, worn or unsealed surfaces.
Vinyl tiles and planks have joints where water can creep under the edges and weaken the adhesive, so keep the mop only slightly damp. Never use steam mops, because heat can make the tiles curl and loosen. Grit is the main cause of wear on vinyl, so regular sweeping does more for the finish than any cleaning product.
How to clean PVC flooring
PVC flooring is cleaned the same gentle way, with a damp microfibre mop and a mild soap solution, followed by a dry cloth. PVC is a rigid plastic with a smooth, non porous surface, so dirt sits on top rather than soaking in, which makes routine cleaning quick. Pay extra attention to textured or slip resistant PVC, where dirt settles in the grooves and a soft bristled brush lifts it out when rubbed along the pattern.
Avoid acetone, nail polish remover, strong bleach and petrol based products, as these can soften or discolor the surface. Heat is another risk, so keep hot pans and sharp metal furniture feet away from the floor and use felt pads or protective mats where heavy items stand. In garages and utility rooms in Ras Al Khaimah, where dust and sand build up quickly, a daily sweep keeps the surface looking clean.
Marks, scuffs and sticky residue
Most marks and scuffs on vinyl and PVC come off with a soft cloth, a little warm soapy water and gentle rubbing, without any strong chemicals. For black scuff marks from shoes or furniture, rub lightly with a cloth dampened with a paste of water and baking soda, then wipe clean. To soften sticky residue, such as adhesive from tape or stickers, hold a cloth soaked in warm water on the spot for a minute, then wipe it away with a plastic scraper or an old bank card.
Avoid metal blades, steel wool and scouring powders, which scratch the protective wear layer that guards the printed pattern. Some pigmented products, such as rubber mat backing, can permanently stain vinyl over time, so choose vinyl safe mats. If a mark doesn’t lift after gentle cleaning, stop and test a more specialized product on a hidden patch first.
Tools and Equipment What You Actually Need
A home needs only a few basic tools to clean floors naturally: a soft broom or vacuum, a flat microfibre mop, a bucket, a brush for grout and textured surfaces and several microfibre cloths. Specialist machines and long shopping lists are unnecessary, because the right mop and a dry finish matter more than the number of tools.

Mops (flat mop, mop with bucket) and which suits which floor
A flat microfibre mop suits most floors, while a traditional mop with a bucket works best on tile and other water tolerant surfaces. Flat mops hold little water, which makes them the safest choice for wood, engineered wood, laminate and vinyl, where excess moisture damages seams and edges. Their washable pads also trap fine dust instead of pushing it around.
A mop with a bucket and wringer gives more control over rinsing on ceramic, porcelain, granite and sealed stone and it copes better with grimy hallways and balconies. Use a fresh pad or clean the mop head between rooms and wring it until it is barely damp on any floor that dislikes water. Avoid sponge mops on grout heavy tile, because they push dirty water into the joints.
Brushes, wipers, pads and microfibre cloths
Brushes, wipers, pads and microfibre cloths each solve a specific problem and choosing the right one prevents scratches. A soft bristled broom or vacuum removes sand before mopping and a stiff hand brush or grout brush loosens dirt from joints and textured tile. In bathrooms and wet areas, a rubber squeegee wiper pulls water towards the drain and speeds up drying.
Soft mop pads protect polished surfaces, while abrasive scouring pads and steel wool should stay away from vinyl, laminate, polished stone and glossy tile. Microfibre cloths are the most useful item for a final buff, since the fibres are defined as thinner than one denier, which lets them lift fine dust and moisture better than ordinary cotton rags. Keep separate clothes for the bathroom and kitchen to stop germs spreading.
A simple home floor cleaning kit and supplies
A simple home floor cleaning kit costs little and covers almost every floor type. It should contain a soft broom or vacuum with a hard floor setting, a flat microfibre mop with two or three spare pads, a bucket, a spray bottle, a grout brush, a squeegee and a stack of clean microfibre cloths. For supplies, keep mild liquid soap or a pH neutral stone cleaner, white vinegar for glazed tile only and baking soda for stains and grout.
Store the items together in one cupboard so the routine stays easy and wash the pads and cloths after each use, without fabric softener, which reduces how well they absorb. In Ras Al Khaimah, where dust and humidity return quickly, a ready kit makes short daily cleans realistic. For floors that are damaged or worn beyond cleaning, Home Fix Building Maintenance provides flooring and roof services across Ras Al Khaimah.
Natural vs Chemical Floor Cleaners What to Avoid
Natural cleaners such as mild soap and warm water are enough for routine floor care, while chemical cleaners should be kept for specific jobs and used with care. Acids, bleach and ammonia based products are the main ones to avoid, because they can dull stone, damage grout and release harmful fumes in a closed room.
Common floor cleaning chemicals and what they do
The most common floor cleaning chemicals fall into four groups: alkaline degreasers, acidic descalers, bleach and disinfectants. Alkaline degreasers, including many multi purpose and ammonia based cleaners, break down grease and are useful in kitchens, but strong versions strip sealers and dull wood finishes.
Acidic descalers, such as hydrochloric or phosphoric acid products, dissolve limescale and cement haze, yet they are far too aggressive for most home floors. Household bleach usually contains about 5 to 6% sodium hypochlorite, which whitens and kills germs but can discolour grout, fade coloured tiles and harm wood. Disinfectants kill bacteria but do not remove dirt, so they work best after cleaning. Never mix bleach with vinegar, ammonia or acidic cleaners, because the combination releases toxic gas.
Why acid damages marble, travertine and grout
Acid damages marble, travertine and grout because all three contain materials that dissolve or weaken when acid touches them. Marble and travertine are made mostly of calcium carbonate, which reacts with acid and leaves a dull, rough patch known as an etch. Etching cannot be wiped away and it usually needs professional honing and polishing to repair.
Grout is cement based and porous, so acid slowly eats into it, leaving joints that crumble, discolour and trap more dirt. The pH scale is logarithmic, so each step down is ten times more acidic, which means a descaler with a very low pH is vastly harsher than the mild vinegar used on glazed tile. Even a quick rinse is unsafe on stone, so use a pH neutral cleaner instead.
Disinfectants such as Dettol when and how to use them on floors
Disinfectants such as Dettol are useful on floors after spills involving raw meat, pet accidents or illness in the home, but they aren’t needed for everyday cleaning. Clean the floor first, because dirt reduces how well a disinfectant works. Then dilute the product exactly as the label directs, mop the area and leave it wet for the contact time stated on the bottle before wiping or letting it air dry.
Use only a lightly damp mop on wood, laminate and vinyl and test a hidden patch on sealed stone, as repeated use can leave a film. Never combine a disinfectant with bleach or other cleaners and keep children and pets off the floor until it is dry. For routine cleaning, plain soap and water remain the safer choice.
Floor Cleaning Mistakes That Damage Floors
The most common floor cleaning mistakes are using too much water on wood and laminate, using vinegar on natural stone and relying on steam, abrasive pads or heavy polishes. Each one can cause damage that regular cleaning cannot reverse, so avoiding them protects both the floor and the money spent on it.
Too much water on wood and laminate
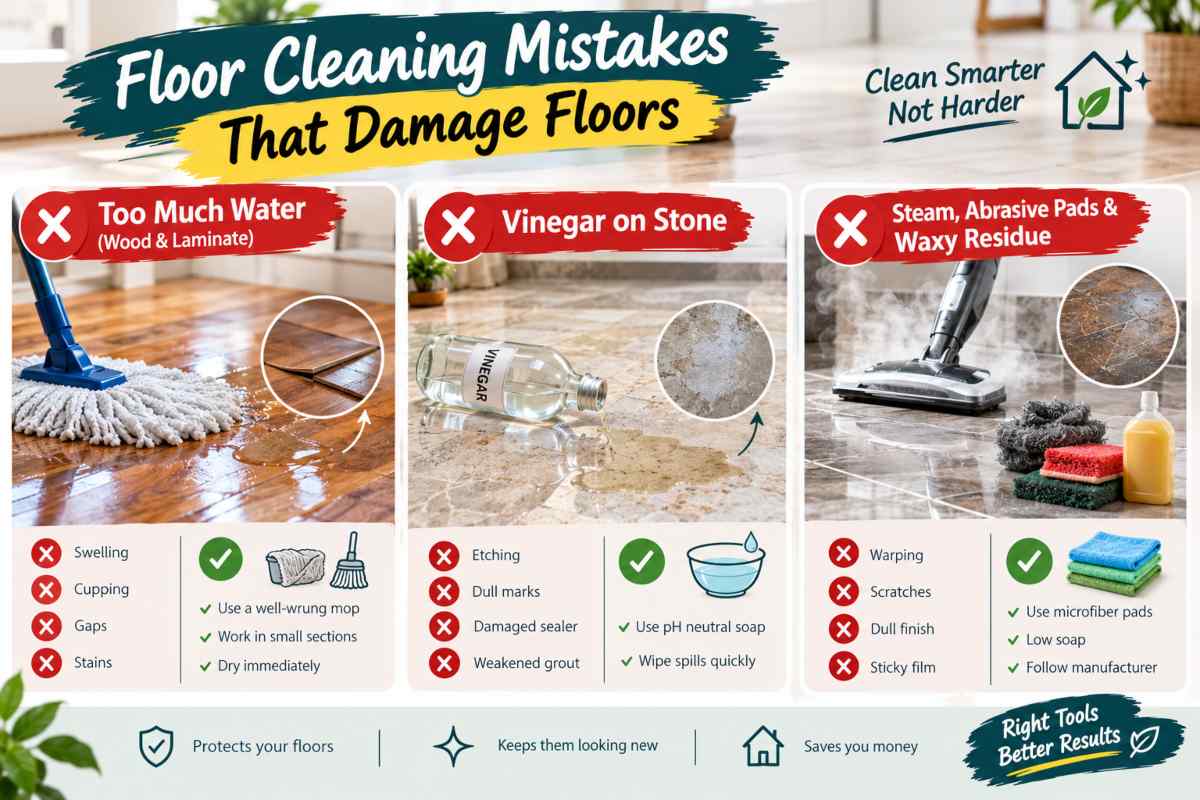
Too much water is the biggest threat to wood and laminate floors, because moisture seeps into the seams and swells the boards from underneath. Wood is a natural material that absorbs water and expands, which leads to cupping, gaps and dark stains. Laminate and engineered wood have a fibreboard or plywood core and once that core swells, the edges lift permanently.
Mopping with a dripping cloth, leaving spills to sit and pouring water onto the floor are the usual causes. Instead, wring the mop until it is barely damp, work in small sections and dry the surface immediately. In humid Ras Al Khaimah summers, boards already absorb moisture from the air, so extra water makes the problem worse.
Vinegar on stone
Never use vinegar on natural stone such as marble, travertine, limestone or onyx, because the acid dissolves the surface and leaves permanent dull marks. Many people reach for vinegar because it is popular as a natural cleaner, but household vinegar contains about 5% acetic acid, which is strong enough to etch calcium based stone in minutes.
The damage shows as pale, rough patches that no amount of mopping removes and it often needs professional honing and polishing to fix. Vinegar also wears down the sealer and the grout between stone tiles. Use warm water with a few drops of pH neutral soap instead and wipe up acidic spills such as lemon juice, wine and fizzy drinks straight away.
Steam, abrasive pads and waxy residue build up
Steam mops, abrasive pads and heavy wax or oil polishes each damaged floor in a different way. Steam forces hot moisture into seams and joints, which can warp wood, lift laminate and loosen vinyl adhesive and many flooring makers state that steam cleaning voids their warranty. Abrasive pads, steel wool and scouring powders scratch the protective layer on polished tile, vinyl, laminate and stone, leaving a dull, scuffed finish that attracts more dirt.
Too much soap or polish has the opposite effect, forming a sticky film that traps dust and makes the floor look cloudy. Avoid all three, use soft microfibre pads, add soap sparingly and follow the manufacturer’s care guidance for each floor type. If a floor already shows warping, deep scratches or lifted edges, Home Fix Building Maintenance offers flooring and roof services in Ras Al Khaimah for repair and restoration.
Floor Care Schedule Daily, Weekly and Monthly
A simple floor care schedule is a quick dry clean every day, a lightly damp mop once a week and a short check or deeper clean once a month. This rhythm keeps dust and moisture from building up and suits every floor type, with small changes for wood, tile, stone and vinyl.
Quick table by floor type
The table below shows the minimum routine for each common floor type. Sweeping or vacuuming comes first in every case, since loose grit scratches a floor when it is mopped over.
| Floor type | Daily | Weekly | Monthly |
| Hardwood | Dry sweep or soft-brush vacuum | Barely damp mop with mild soap, dried at once | Check for gaps or cupping; deep clean every 2 to 3 months |
| Engineered wood and laminate | Dry sweep or vacuum | Slightly damp microfibre mop, dried at once | Check seams and edges for lifting |
| Ceramic and porcelain tile | Sweep or vacuum | Mop with mild soap; diluted vinegar rinse on glazed tile if needed | Scrub grout lines with baking soda paste |
| Natural stone (marble, travertine, granite) | Dust mop or soft vacuum | Mop with pH-neutral cleaner, then dry | Inspect for stains and dull patches; test the sealer with a few drops of water |
| Terrazzo | Dust mop | Mop with neutral cleaner, then dry | Spot-treat scuffs; look for lost shine |
| Vinyl and PVC | Sweep or vacuum | Damp mop with mild soap | Remove scuffs and check edges and seams |
If water soaks into a stone floor within a few minutes during the sealer test, it is time to ask the installer or a stone specialist about resealing. Busy areas such as hallways, entrances and kitchens may need the weekly step twice.
Seasonal tips for RAK summer humidity
In Ras Al Khaimah’s humid summers, the main goal is to keep floors dry and the indoor air from becoming too damp. The US Environmental Protection Agency advises keeping indoor relative humidity between 30% and 50%, since higher levels encourage mould and dust mites and push wood and laminate to swell.
Run the air conditioning steadily rather than switching it on and off and use a dehumidifier in closed rooms or storage areas if the air still feels heavy. Mop with less water than usual, dry every floor straight after cleaning and wipe condensation from tiles near windows and bathrooms. Wash mop pads and cloths after each use, because damp fabric left in a bucket quickly develops a musty smell that transfers to the floor.
Dust and sand rise in the drier, windier months, so add an extra dry sweep and keep doormats in place at every entrance. If a floor shows lifting, swelling or persistent damp patches despite regular care, the cause may lie below the surface. Home Fix Building Maintenance offers residential and commercial services across Ras Al Khaimah to inspect and repair these problems.
When DIY Is Not Enough
Cleaning cannot fix a structurally damaged floor, so call a professional if you see lifted planks, cracked tiles, hollow sounding patches or signs of water coming from below. A repair at this stage is usually smaller and cheaper than waiting for the damage to spread.
Signs of deep damage, lifted planks, cracked tiles or water seepage
The clearest signs of deep floor damage are boards that lift or cup, tiles that crack or sound hollow when tapped and damp patches or stains that return after drying. Lifted or swollen planks usually mean moisture has reached the core or the subfloor. Cracked or loose tiles often point to movement underneath, poor adhesive or water getting in through the joints.
Seepage shows up as dark marks, a musty smell, bubbling paint near the skirting or grout that stays wet long after mopping. The US Environmental Protection Agency notes that mould can begin to grow within 24 to 48 hours of water damage, so you should address a leak quickly. Scrubbing harder will not help, because the cause is below the surface and sealing or covering the area can hide the problem and let it grow.
When to call Home Fix Building Maintenance for flooring repair or restoration
Call Home Fix Building Maintenance when a floor needs more than cleaning: repair, replacement, resurfacing or a check for hidden moisture. The team handles a range of floor types across Ras Al Khaimah and the right service depends on the floor. For solid timber that has cupped, scratched or lost its finish, see hardwood flooring. For swollen or lifting boards, visit laminate flooring.
Cracked, stained or peeling garage and utility floors may suit epoxy flooring, while worn or dusty concrete can be resurfaced with polished concrete flooring. Loose, cracked or discoloured tiles are covered under floor tiles. For a full overview of options, see Home Fix Building Maintenance flooring and roof services. Property owners and managers who would rather prevent damage than react to it can also set up regular inspections through annual maintenance contracts services.
Frequently Asked Questions (FAQs)
What is the best natural floor cleaner?
Warm water with a few drops of mild liquid soap is the best all round natural floor cleaner. It is gentle enough for wood, tile, stone, laminate and vinyl and it leaves very little residue when you dry the floor afterward.
Can I use vinegar on all floors?
No, vinegar is only safe on glazed ceramic, porcelain and sealed vinyl. Keep it off natural stone, hardwood and grout, because household vinegar is about 5% acetic acid and can etch stone and wear away finishes.
How do I clean floors without streaks?
Use very little soap, change the rinse water often and dry the floor straight away with a clean microfibre cloth. Streaks usually come from soap residue or hard water drying on the surface, not from dirt.
How often should I clean hardwood and tile floors?
Sweep or vacuum both daily or every second day and mop once a week. Hardwood needs only a barely damp mop, while tile can take a little more water and a monthly grout scrub.
Is Dettol safe for floors?
Diluted Dettol is safe on most sealed floors when used as directed, but you only need it after spills such as raw meat or pet accidents. Test it on a hidden patch first and never mix it with bleach or other cleaners.
How do I clean floors naturally in humid weather?
Use a barely damp mop, work in small sections and dry each floor straight after cleaning. Maintain the indoor humidity between 30% to 50% with steady air conditioning or a dehumidifier to protect wood and laminate.